Journey Mapping: RideCommand & Google
|
Ride Command Details
RideCommand is a touch-screen infotainment system made by NNG Software Developing and Commercial LLC for Indian. I've made sure to download the latest map from Indian's customer support site. To do this, requires a laptop or desktop computer, software from Indian, and a USB thumb drive 8GB or 16GB in size. The application you will need for your computer is called Map Toolbox. |

|
Google Maps Setup
Google Maps was the tool that I used to plan my destinations and to some level, the routes I wanted to take. I've done this before, and I ended up working extensively with this product over the years. The best place to use this is on a desktop or laptop to prepare your ride. |

|
Procedures
This is going to be the long part. Having knowledge of some of these tools will be helpful in following along. Some information will be high-level, and some will be greatly detailed. This is not designed to be a "step-by-step, click this, type that" set of instructions. However, if you have any questions on this content, please let me know, and I will give you any assistance I can in the details that you need via email. Click the envelope on the left or here to send a question to me. |
PreRide Technology Preparation
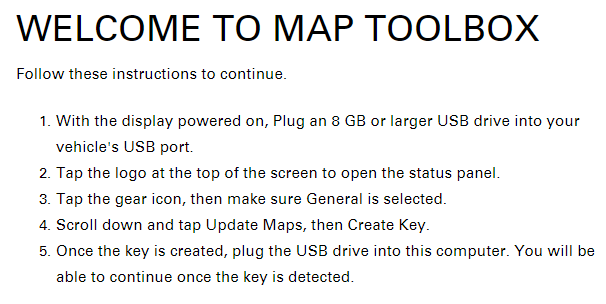
- Make sure you use Indian's website to update your RideCommand software on the motorcycle. You can also download the most updated map at this time, but the map update procedure is in the next step. Make sure to have a blank 16GB USB just for your Indian RideCommand and mapping update process.
- Download and setup the Map Toolbox software on your computer. Follow it's instructions to securely update the map on your motorcycle. Also, make sure the map is on the root folder of the USB drive.
Daily Procedures (Best Practices)
- Use Google Maps and select the options you want as far as avoiding highways and avoiding tolls (and do this on a laptop or desktop). Now, be alert here: in Google Maps, you can avoid tolls, but the application will make you go through a toll if there is no possible way to avoid it. RideCommand doesn't seem to have the same algorithm, and will take you around the world to avoid a toll if it is possible. So if your Google Map route includes any toll road at all, you must reset the Google Map to use toll roads, and possibly reset your route.
- Make sure to create each point in your map. Dragging and dropping a waypoint in Google Maps without setting it up as an actual destination will not work out the way you want it (I've tried and experimented with this, so you don't have to). Your map must have a start, an end, and defined points in between. For example, if you have 5 of these "points" on the map, and have less than 5 entries in the left side window pane (start point, 3 defined waypoints, and an end point), then you don't have the map setup the best way for importing it to the bike.
- Copy the Google Map link when you are done. Optionally, using the page's share or embed map option provides you to have google create a shorter URL name. I suggest using that feature after you re-position your map to see the whole start to finish option on your desktop or laptop screen.
- Go to the GPS Visualizer Conversion page to paste your link in the field provided (look for the text field to the right of the phrase Or provide the URL of a file on the Web)
- Click on the show advanced options link at the bottom of that window; the text is the same with a [+] sign in front of the text that turns to a [-] sign when you do this.
- Set Remove all tracks to Yes.
- Set Merge all tracks to Yes.
- Set GPX/CSV routepoints to Convert all points to waypoints.
- Click the CONVERT button closer to the top right of the window.
- The conversion takes place. You can click the long-ass file name on the screen to download that system generated file to your Downloads folder on your computer.
- << the super special vanity step which I STRONGLY RECOMMEND you consider doing >> To be detailed in a different post, there is a way that you can edit the file you just downloaded from the GPS Visualizer site, so that in the conversion and import process, RideCommand doesn't display "Stop 1," "Stop 2," for each location. As an aside, these GPX files are actually specially formatted text files called XML files, knows as Extended Markup Language. You may wish to edit the file and replace the name of each waypoint (wpt >> name text key entry) to something other than a GPS coordinate, or the full descriptive name of your starting and ending locations. Deeper tech people know the concept of, or have some level of skill in writing a script or creating source code, will know what I'm talking about. If you're not one of these people, do not worry because using the right tool even if you're not XML savvy, will allow you to do this easily. I use a tool called XML Notepad 2007 from Microsoft. It is 100% free to download and use. Another post some other time in the near future.
- Go to the RideCommand converter page.
- Click on the CHOOSE A FILE button; find the file you just downloaded, and select it.
- When the page has your file identified, click the CONVERT button; wait for a new file to download, and then use your computer to rename the file into a name that is both short and meaningful.
- Insert a USB thumb drive into your computer, go to the renamed file, and copy it to the thumb drive - just do not put it inside a folder.
- Take the USB thumb drive out of your computer, go to your motorcycle, insert the USB thumb drive into the USB receptacle on your Indian.
- Press the power button on the Indian. Do not worry about the bike's power going off, you should be able to finish the final few steps before power is cut from the bike. If you are worried about it, please make sure you setup the system to not automatically power down.
- Press the off-screen GPS button.
- (Screen) Tap the bottom-right search icon (looks like a magnifying glass).
- Tap the Saved button.
- Tap the Sent To/From USB tab.
- In the USB Drive column on the right, find your file and tap it.
- Confirm the import.
- While the map is loading and the route is being calculated, be sure to set the options to use the Fastest route, as well as setting the avoidances to be identical to the avoidances you were designing in Google Map at step #1. This is absolutely crucial.
- Be sure to power down the motorcycle once the routing has been completed. This is just as crucial if you setup the file to ignore the auto-powerdown feature. BATTERIES BEWARE!!!!
BONUS CONTENT: Step #11 video on how to use the Microsoft XML Notepad 2007 application. Click here.
